Welding Symbols Chart: An Explanation of the Basics (with Pictures)
Last Updated on
Download the Welding Symbol Guide in .PDF Form:
Do you need to study on the run? Download the symbols chart as .PDF here.
Becoming a professional welder is rewarding and provides a lifelong opportunity to enjoy fulfilling employment worldwide. There are many challenges along the way, and most are practical skill-based challenges. However, sooner or later you will be faced with drawings you’re required to weld from. If your experience is anything like mine, you’ll find some draftsmen can make life tough with their drawing attempts.
Some are better than others, but you will inevitably be faced with a few that provide you with little more than a headache on paper. It is helpful to understand welding symbols so that when you’re faced with complicated drawings, the symbols will be one less obstacle to overcome.
Welding Symbols Test
There are also various theoretical tests you may be required to take during your career, including your qualification and certification tests. It’s equally crucial to master these welding symbols to gain your qualification. Although some test symbols are simple, you can’t trust your working experience alone. Studying this guide to welding symbols will help ensure you are one step closer to acing your next exam.
Welding Symbols
Some welding symbols look complicated, but when they are broken down, you will see they’re quite simple. The welding symbols are illustrations of the pre-weld joint looking side on, as through a cross-section. Each weld symbol is explained individually, with its weld profile alongside it.
There are two systems that are used for interpretation, and four sections of different symbols explained in this article: the base platform, base butt weld symbols, other base symbols, and supplementary symbols. Each section stands alone if you need to focus on one set of welding symbols, but reading through all four will give you a helpful grasp of the overall system.
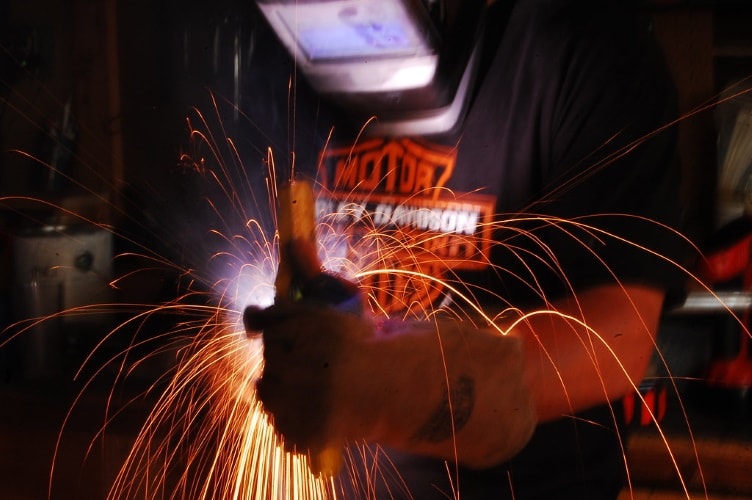
1. The Base Platform
This symbol is a simple platform for displaying the characteristics and surrounding details for your welds. It has three parts:
- The arrow line: points to the general location of the weld.
- The reference line: this is where the details are placed about the type of weld and the specific location.
- The tail: this is where the complementary details, separate from the specifics, are placed. This includes welding standards, material types, and the welding process required.
The Two Drawing Systems
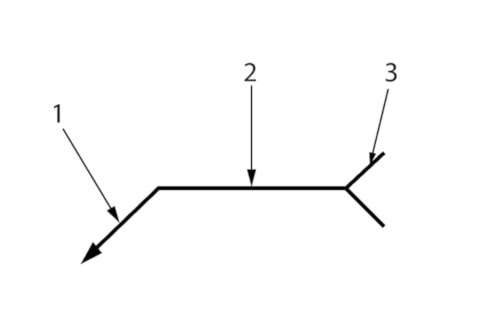
There are two systems the base welding symbol comes in, and they are each interpreted differently. The specific system will be indicated on the plans, and both systems will not be included on one drawing.
System A System B
Base system A
Base system A is distinguished by the dash lines underneath the reference line. As the image illustrates, when the welding symbol is on the dashed line side, the weld needs to be on the opposite side of the arrow. When the welding symbol is on top of the reference line, the weld needs to be on the same side as the arrow. Sometimes drawings are very full, so this rule is necessary in case there is no room for the base symbol to be on the side the weld is.
Base system B
Base system B is recognized by the absence of dashes below the reference line. Here, when the welding symbol is on the underside of the reference line, the weld is on the side the arrow points at. When the symbol is on the top side of the reference line, the weld is on the opposite side of the pointer.
Base Butt Symbols
As the name states, these joints are distinguished by their butting up to each other end to end. For example, two plates sit flat on their faces aligned parallel and straight across their tops, and they are welded on one or both sides depending on the symbol.
Single-Sided Butt Welds
These joints are only welded on one side and are easily recognized as single-sided by their symbol. The symbols reveal their required weld prep, and the type of weld needed is determined by other symbols.
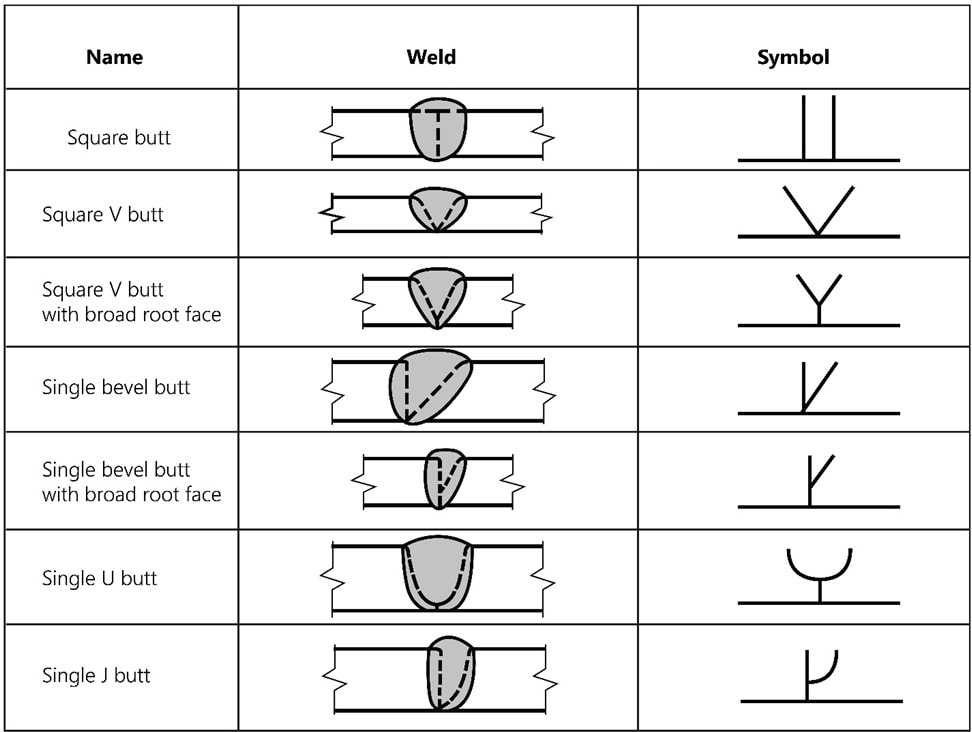
Square butt
This joint has no weld prep. Both plates have square ends, just as the weld symbol displays two square angles.
Single V butt
The single V butt joint has a 45° weld prep on one side of each plate the full depth of the material. The joined plates will form a V shape as the symbol indicates.
Single V butt with broad root face
Similar to the single V butt, this weld prep has a 45° angle on one side of each plate from the top of the metal to no more than ¾ of the way down the plate depth, leaving a section of material below. The joint imitates its symbol as a Y.
Single bevel butt
This butt prep has a 45° angle cut the full depth on one side of a single plate, while the other end is square as the symbol displays.
Single bevel butt with broad root face
With one square end and a 45° bevel on the other side only partly through the plate, the weld prep will look like its symbol, as a lowercase r without an arc.
Single U butt
Both plates have a corner cut out in a ¼ moon shape about ¾ of the plate gauge deep to form a U partway through the joined sections, as the weld symbol shows.
Single J butt
One plate has a square end, while the other has a corner cut out in a ¼ moon shape part way through the plate thickness, forming a mild J when joined, as you can see in the symbol.
Double-Sided Butt Joints
These welds are precisely the same as single-sided butt joints, except both sides are prepped and welded, as shown in the below weld symbols chart.
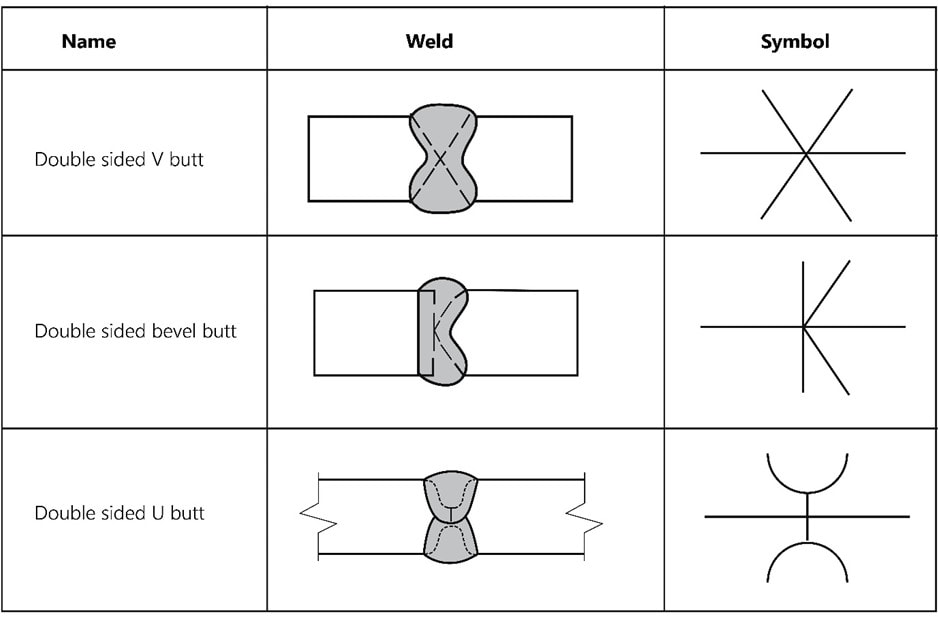
Double-sided V butt
Both ends of each plate have a 45° bevel cut out meeting halfway through the plate to form a point. When joined together, the points meet. This creates an X as seen in the symbol, the full depth of the joint.
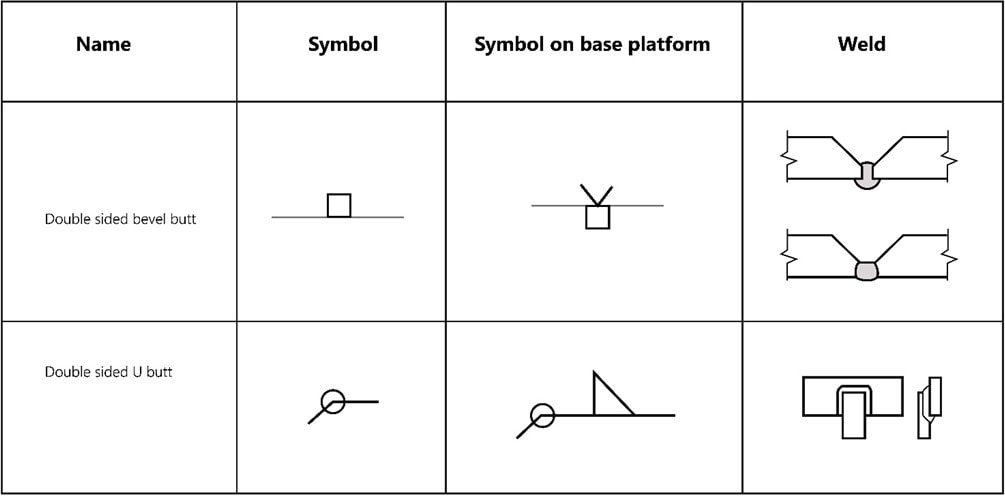
Double-sided bevel butt
One plate has no weld prep, keeping its corners square. The other side has two 45° bevels finishing along the middle to make a point. As the symbol displays, the joined plates will form a K.
Double-sided U butt
Both sides of the two plates have a ¼ moon cut out, leaving a section about one-quarter to one-half the plate gauge in the center between the two weld preps. When joined together, they make a U on top of an n, just as you see in the symbol.
Other Base Symbols
Butt welds and fillet welds are the most common types of stitch. However, unlike the majority of butt welds, the different kinds of fillet welds are indicated by supplementary symbols added to the fillet symbol. Following are all the other base welding symbols that are not butt welds, including the fillet symbol.

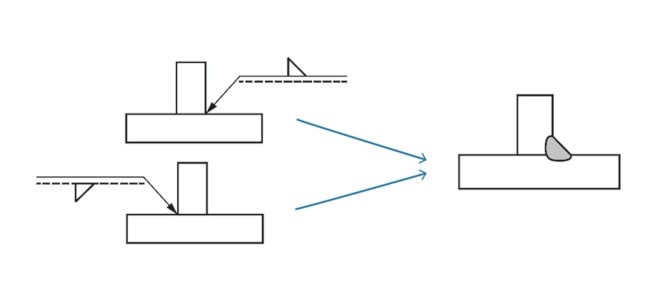
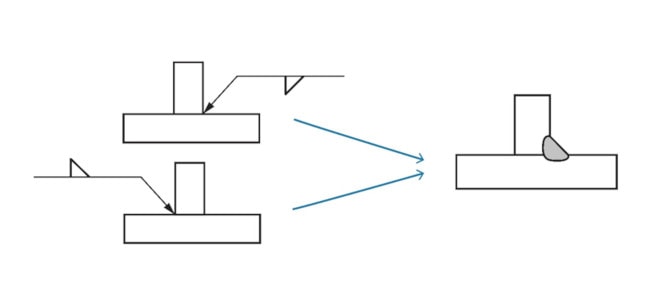
Fillet
This symbol has a right-angled triangle, since the most common fillet joint is between two plates at a right angle to each other. Usually, it’s between a 90° joint, or somewhere close.
Plug
One plate with a hole sits on top of another plain plate. The plug weld fuses the two plates together, with a weld inside it completely filling the hole. Its symbol is the least clear of them all, but it displays the plug’s hole in a cross-section view of the top plate.
Resistance spot
Two plates are fused together by creating heat from electrical resistance between the plates with a resistance spot welder. Its symbol is a circle, the same shape as a spot weld.
Resistance seam
This is like a resistance spot weld, only the electrical resistance creates a long seam weld rather than a single spot. Similar to the spot welds symbol, the seam weld has two parallel lines through the circle symbolizing the seam weld having length like a slot shape. The resistance seam creates a circle shape that is spread out lengthwise.
Supplementary Symbols
These symbols are added to the base symbols to clarify the type of weld required. They include characteristics of the weld, how and where to weld it, and the finishing features needed.
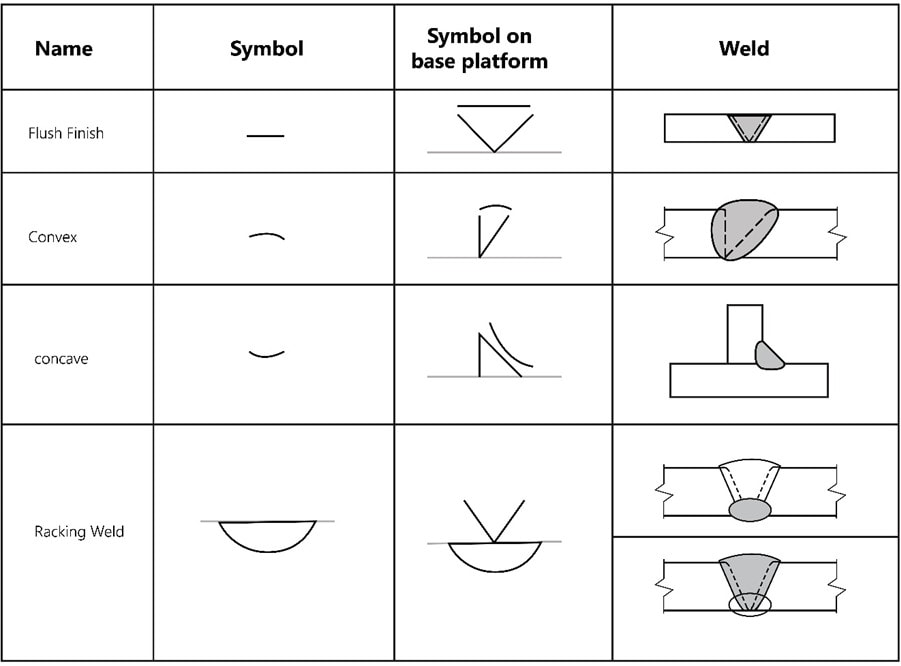
Flush finish
This weld symbol signifies that the weld needs to be machined or ground back flush to the level of the rest of the plate. Its symbol is a straight line showing what the finished surface will look like.
Convex
The convex finish of a weld curves outwards like a balloon away from the weld, just as its symbol displays.
Concave
The concave’s symbol is curved in the opposite direction from the convex, symbolizing that the weld should be finished with an inward curve like the inside of a bowl. It is often a finish used with fillet welds.
Racking weld
This is when the bottom of a weld prep like a V or U needs a small initial weld at the weld prep’s base before fully welding it. It gives substance for the full weld to take place without blowing through from excessive heat when only a thin section of material remains. Its symbol as a curved line is placed underneath or on top of the base welding symbol, depending on what side of the reference line the base symbol is on.
Consumable insert
Inside a weld prep, a consumable plug is inserted at the bottom where there is space between the two sections. The insert is fused in with the weld and stops the bottom from blowing out. Its symbol is the shape of a round insert looking at it side-on.
Weld entirely around
This symbol circles the corner of the base platform to show that the section being pointed at needs welding the whole way around it, like a circle.
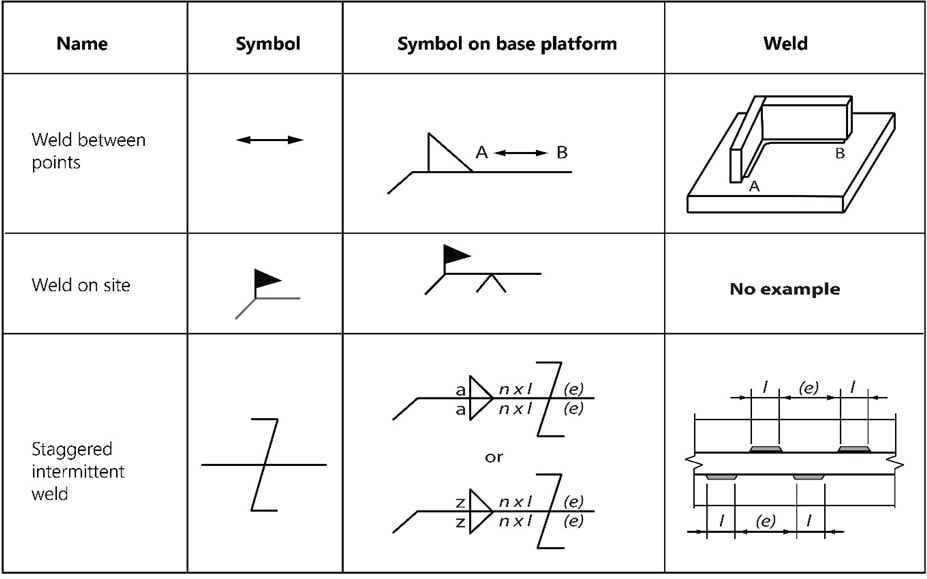
Weld between points
The drawing will show two points like an X and a Y, for example, between sections needing welding. The arrows of the symbol between the two letters indicate that a weld needs to run the full length between the two marks.
Weld on site
This symbol has a flag showing the weld needs to be done on-site, not in the workshop. Just as a flag is positioned to mark a country’s site, so this flag indicates it must be welded at the project’s site.
Staggered intermittent weld
This requires welds to be staggered intermittently across side one and side two of a section. Don’t weld the full length of both sides. Instead, weld even stitches across side one. Then imitate the welds along side two, but in between side one’s welds, not aligned with them.
The Z-shaped symbol with a line passing through its center displays the effect of a 7 in a mirror. It shows two 7s equally proportioned but flipped, making a Z. Likewise, the staggered intermittent weld is equal on both sides of a feature but flipped so that the welds sit in different places but with the same spaces.
Conclusion
As you can see, the system surrounding welding symbols isn’t too difficult. Most symbols are based on the cross-section view of the joints they represent. Be sure to download the PDF version of this welding symbol guide to refer to on the job and ensure your welds are correct according to the drawing.
Feel free to leave a comment below with any questions you may have.
Sources used:
Featured Image credit: Lew Erber, Flickr.com