6 Different Types of Welding Joints - What are the Differences?
Last Updated on
Do you struggle with the terminology of welding joints, or not know how to weld a specific joint in the best way for your project? Without a thorough guide or significant experience, it can be challenging. Read on and you will learn the six joints, their differences, and what to watch for when welding them.
There are two types of welds performed in six different joints. All of them are simple to understand, and when each name is explained, you will appreciate the helpful word-hooks each name has to remember.
Types of Welds
These two welds can be performed in exactly the same way. There can be a difference in their strength depending on how they are prepared and executed within their settings, but it’s mainly the space you’re welding into that determines its name.
1. Butt weld
A butt weld is when two faces of different plates are positioned hard up against each other and flush along their tops. Sometimes they are at a slight angle, but generally they are aligned straight. This weld gets its name because the two plates typically butt up to each other end to end.
This type of weld can have sections cut out of the corners of the plates in various shapes and sizes. These are called weld preps and are added to provide more depth of weld to the joint. The joint can also have two square ends without any weld prep. The more weld prep is added, the stronger the joint will be, resulting in time added to the job. Therefore, when a project doesn’t require it, it’s best to weld their square ends rather than cut the weld preps.
2. Fillet weld
This type of weld is within the internal corner of two plates. Most commonly the corner is a 90° angle, but it can be any angle less as long as you can weld in it, and any angle more up to about 145°. It gets the name “fillet” because “fillet” is an old word used to describe a triangle-shaped piece of material similar to the shape of the inside angle you weld a fillet weld into. I remember fillet by the term “fill it,” because when there is a corner to weld up, you fill it with weld, unlike the butt weld where you typically cover it with weld.
The Types of Welding Joints
Below are the six types of welding joints
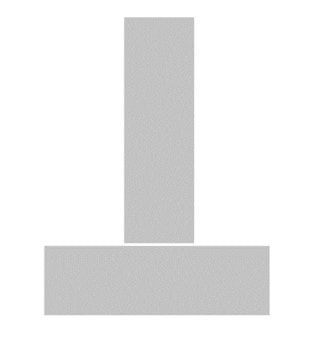
1. Tee Joint
The tee joint is, as the name describes, a joint in the shape of a T. One piece of metal lays down flat, while another section is welded standing on its side or end upwards. It’s a simple-looking joint. Although this weld tends to be easier in most ways, it can prove challenging to execute, due to the weld pulling either direction from a lack of surface area holding between the two welds.
It almost always has welds on both lengths of the upright plate, and frequently has the ends welded, completing it with four sides fused to the base plate.
What to know when welding tee joints
It’s essential to be aware of the way welds pull and distort the metal. The piece that stands upright will need to be at a certain angle, and if you tack it at the right angle and weld it there, it will always pull towards the side you weld first. It’s therefore necessary to weld it in such a way that this doesn’t happen. There are two good options to prevent this from happening, explained below. The material used and the requirements for the surface finish will determine the best way to ensure your joint ends within your angle tolerance.
Option one
Tack the plate in position, so it’s sitting at the right angle and location. Then tack some braces to both sections being welded, checking as you go that it hasn’t moved or pulled in the process. Once there are enough braces to stop it from moving, follow the four steps of completion. Weld the joint fully, wait for it to cool, cut the braces off (ensuring you don’t cut into the job), and grind off the weld with a soft grinding disk, like a flapper wheel, to leave a clean finish. This option can be used for smaller jobs, but it’s typically used for large sections where straightening after you weld is difficult.
Option two
Tack the plate on a slight angle away from the side you will weld first, so that when you fuse it, it pulls into the position it needs to be in. This takes experience and will never be mastered right away. You’ll need to learn how much the plate will pull in different circumstances, because it will change depending on the material and size of your welds. Over time you will get accurate with it, but in the meantime, keep practicing with gradual adjustments on scrap pieces of plate to get a feel for it.
Once the weld is complete, check that the angle is correct. Make sure your measuring tool will clear the weld for an accurate measurement. For example, if the joint needs to be 90°, the square you use will require that the corner be cut off between the two measuring sides, so it clears the weld when used.
If the angle isn’t right, tap the welded plate with a soft hammer to persuade it into position. The hotter the weld, the more easily it will move. Make sure it’s bending at the weld, not bending a crease in the plate above the weld. Don’t use a steel hammer; otherwise, you may dent the plate when you hit it.
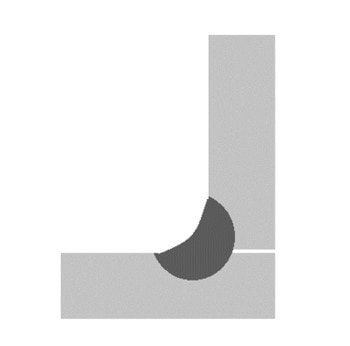
2. Square Joint
The square joint is like the tee joint, only it’s an L, not a T. Plate A lays flat, while plate B stands on its tip flush with plate A’s end to get butt welded together. There will be a fillet weld on the other side of the plate between a 90° angle. The plates can be equal or different lengths, widths, and thicknesses. Either end of plate A can also be welded to plate B, depending on the project requirements. The name “square joint” is referring to it being a 90° joint, the same angle as a square is.
What to know when welding a square joint
Square joints are generally not as strong as tee joints. A square joint has a butt weld on one side with a fillet on the other, giving it uneven strengths, unlike the tee joint, which has two fillet welds on either side. It pays to include a weld prep in the butt weld to increase the strength of the joint. Follow either of the two options provided in the tee joint section to finish with a square joint, not a corner joint from plate A pulling.
3. Butt Joint
This is the joint for most butt welds, which is where it gets its name from. Two plates join end on end and flush across the top and bottom of its surfaces. It can be a more difficult weld to achieve, due to it having less of a visual guiding line to make a straight weld with, unlike most other joints. It also requires a weld prep to give it enough strength, unless it’s not a critical weld or has a large convex finish with deep penetration.
What to know when welding butt joints
When welding butt joints, the bigger the weld prep you provide, the stronger it will be. Be cautious of blowing out the bottom if you have an extensive weld prep. Often, a backing weld is necessary for this. A backing weld is when you fill a small section at the bottom of the weld prep with weld before you weld it fully.
Although more weld will produce a stronger weld, if you put too much heat into it, the excess temperature will produce a bow or twist in your project. Welding both sides helps, but it can still warp the plates when too much heat is applied.
4. Lap Joint
A lap joint is when one plate overlaps another one, leaving two sections for fillet welds, one on the top and one underneath. This is often the most reliable welding joint due to the large surface area between the welds. I personally find it the easiest joint to weld. The term “lap joint” is coined from the end of the word “overlap.” The two overlapping plates are described by the shortened term “lap joint.”
What to know when welding lap joints
These joints are smooth going to weld. There’s almost nothing else to worry about once they’re positioned in the right place, other than simply welding it. It’s a great joint to start with when you begin welding. If you can incorporate these joints into your project, it will add extra strength where it may otherwise be lacking.
As with other joints, be careful not to put too much heat into the welds, as it can still warp even though it has a decent section of overlap. If there is a distortion to the plates, it will be at the ends without overlap bending, as they are the weakest point.
5. Edge Joint
An edge joint is where two plates sit face to face with each other like a lap joint, but the edges on at least one side of the joined pieces meet. It always has one butt weld on it. Sometimes that’s all it will have, but it can have the other three sides welded as well with fillets or butt welds.
What to know when welding edge joints
If you only have the one butt weld, be mindful that the plate will most likely separate like a clam opening when welded. It pays to clamp or tack the weld closed before fusing your joint. If there are multiple welds on it, the edge weld can be a solid joint like the lap joint due to the large surface area that’s clamped between the welds.
It can be challenging to make an edge weld look good if it’s being welded without weld preps. It’s good practice, if time allows, to cut a single V butt between the plates. This will provide much more strength and give a nicer finish.
6. Corner Joint
As the name suggests, these are joints that only have the corners of two plates touching. The angle between the plates varies, but it’s often 90° and leaves a big V to fill up. Either side of the corner joint is usually welded, but the inside corner is sometimes left without weld. When these are welded correctly, they can produce a smooth concave finish that looks fantastic.
What to know when welding corner joints
Be sure to clamp or brace your corner joints so they don’t pull out of angle. Don’t crank excessive heat into it, as this will add to the pull. Even if it’s braced, extreme heat can warp the joint. It will need to relieve its heat stress, which the brace stops, so it can distort the whole project instead. Be aware that the strength of the plates relies on the corner alone, as it’s generally all that is welded unless permanent braces are used. Therefore, ensure the corner has impeccable welds.
Final Thoughts
It should be easy to determine which type of welding joints to use for your project depending on the positions your parts need to be in, the access available to get a weld in there, and the strength your project requires. Always find out the load each part will bear, to ensure you’re using the correct joints for it.
Remember the word hooks each name has, so you’ll attribute them to the right joint, as their names make them easy to recognize. Feel free to share any comments or ask any questions below about the types of welding joints you might use.
Cameron grew up in Allentown, Pennsylvania, a once-proud steel town on the Lehigh River, where he got a taste of TIG welding in his high school shop class. He holds certificates for Certified WeldingEducator (CWE) and Certified Resistance Welding Technician (CRWT) from the American Welding Institute. His interests include scuba diving, sculpture, and kayaking.