How To Install A Muffler Without Welding (Quick & Easy)
Last Updated on

The noise issue might sound petty until you realize that driving your car is no longer a smooth and comfortable experience. It also helps in stabilizing the back pressures that result from engine movements. Motorists often overlook this vital component of the exhaust system even though its maintenance requirements are generally low.
If you can replace the new muffler yourself, you minimize the repair cost. Want to take this job on but don’t have welding equipment? The following steps should help you stay on the right track.
Step 1: Task Planning
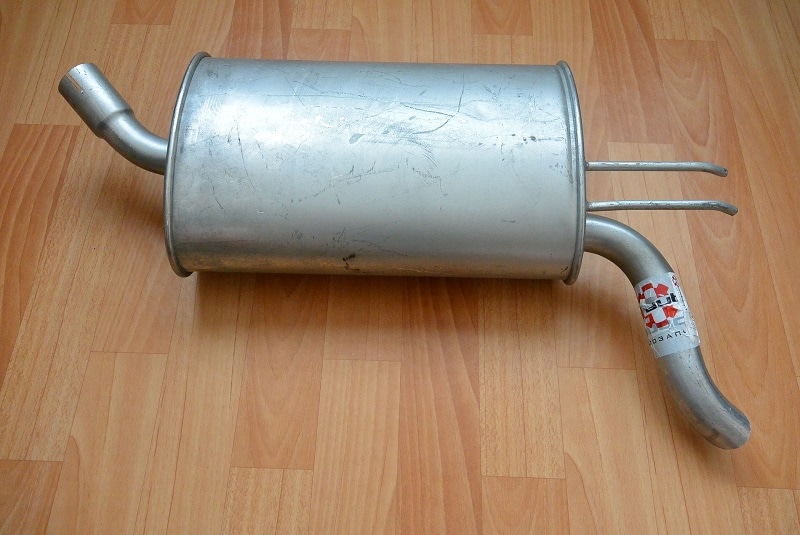
Since this is a technical task, it is imperative to prepare and plan. At the planning stage, ensure you do the basics. For example, check the sizing and the general design of the existing muffler before purchasing a new one. Using a tape measure, check the sizes of the inlet and outlet pipes (diameter of the pipe is normally 2-2½ inches). You should also check the condition of the clamps, hangers, and bolts to determine the necessity of part replacement.
Generally, there are two main joining methods in mufflers: welding and clamping. For the sake of this guide, we shall focus on the clamping method. In clamping, it is easier to assemble and disassemble. It mainly comprises U-bolts (clamps), nuts, and rubber hangers. Due to condensation occurring internally, the muffler is susceptible to leakage and consequently rusting. You will need to replace your muffler more frequently if you stay around an ocean or a salty lake (salty water accelerates rusting).
For a complete overhaul of the muffler and its components, you will need to purchase the following:
- The new muffler
- Exhaust sealants
- Rubber hanger
- Correct sizes of U-bolts and nuts
- Safety gears such as goggles
- Hand gloves (leather)
- Angle grinder
- Anti-rust spray
- O-ring gaskets
Step 2: Preparation
Now that you’ve bought all the required items, it is time to focus on the practical. The car should be moved to a flat, firm, and high friction surface, preferably a rough concrete platform. For automatic transmission, you should ensure the vehicle is in park mode, while for manual transmission, it should be on neutral, with hand brakes engaged.
Step 3: Muffler Overhauling
Before removing the old muffler, inspect its condition, components, and attachments. This inspection should inform you of the extent to which the replacements should be undertaken. Always observe strict safety precautions during the entire dismantling and assembling process. Next, you should carry out electrical isolation by disconnecting the batteries. This is to safeguard against the engine accidentally starting.
3.1 Lifting the Car
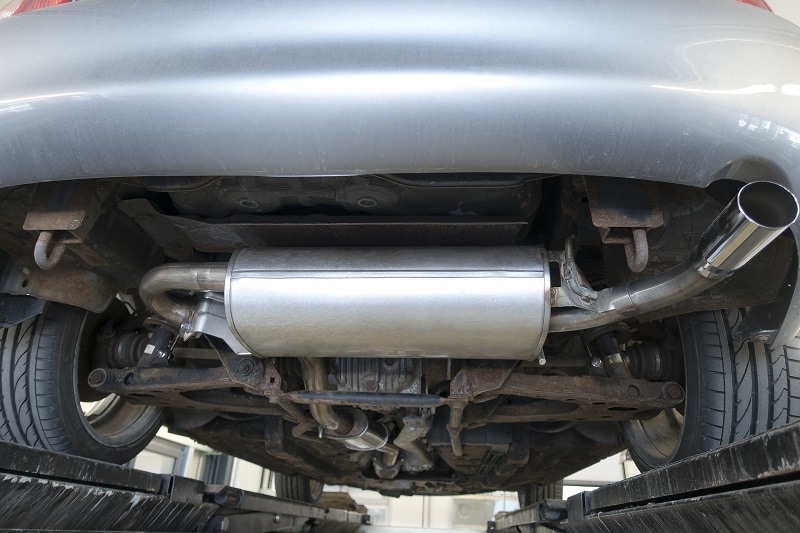
Using the floor jack at the correct points, the car should safely be lifted to a level that is enough for you to slide beneath when unbolting.
Note: Never slide under the car when the jack is the only support structure at this juncture. You should always include block wedges at the rear and front.
3.2 Loosening Nuts and Hanger
By using the correct spanner size, unbolt the clamps. However, due to rust, the bolts may be difficult to remove. If this happens, you can cut them off with an angle grinder. Ensure that the grinder does not damage other parts and spray the anti-rust before removing the bolt.
3.3 Disintegrating Muffler from Exhaust Manifold
The muffler has end-to-end attachments such that the inlet pipe is connected to the exhaust manifold pipe via a sleeve. The O-ring and rubber seal make the muffler leak-proof, while the tailpipe is connected to the exhaust pipe. Cut the end-to-end attachments if and only if they are critically damaged by rust (so new sleeves and seals must be added to the list of items to purchase).
Step 4: Assembling the New Muffler
Most mufflers have directional arrows to indicate the flow of gases and help correctly fit the muffler. In case it is not labeled with an arrow, the instruction manual will come in handy. Remember, you had already taken measurements of the old muffler to ensure you get a similar replacement. Before fitting the muffler, you should spray the exhaust sealant on the end-to-end muffler links.
With the muffler properly laid, you should bring it closer to the exhaust manifold pipe and connect with a sleeve and tighten it. The next step should be to loosely clamp the main body with a u-bolt, nuts, and rubber hanger. The rubber hangers are attached to the U-bolt to achieve some mechanical flexibility. Adjust until the exhaust line is appropriately laid, then tighten the loose nuts.
On rare occasions, pipes may not properly fit. When this happens, you don’t have to panic since some adjustments can be made using extensions.
Step 5: Reconnecting the Battery
Once the process of muffler assembly is complete, the battery should be reconnected, and the engine started. You need to test the engine to find out if the muffler is functioning effectively. Slightly step on the gas pedal and observe the behavior of the entire exhaust system. Listen out for abnormal sounds, leaks, and vibrations.
Should you detect any leakage in the exhaust line, you must identify and fix it appropriately. If the leak is coming from the muffler outlet, you should disengage the attachment and check the seals. Otherwise, the car muffler should operate smoothly.
FAQS
1. Is It OK To Drive Without A Muffler?
It depends on the laws of your country. It is illegal in most countries due to pollution. Generally, you shouldn’t, considering the risks you’ll be exposing your car to.
2. Will Removing The Muffler Destroy My Engine?
No. Your engine is not affected. However, for the sake of your comfort and wellbeing, we suggest keeping your muffler intact.
What Are The Signs Of A Bad Muffler?
The quickest sign is abnormal noise. If your engine starts producing a squeaking sound, that is your signal to have the muffler checked. Also, if you feel an unusual vibration or notice a decrease in fuel efficiency, it could be time to replace that muffler.
Is A New Muffler Expensive?
You most definitely will part with a few dollars but not necessarily cause a dent in your finances. However, if you consider the risks involved in not installing one, you’ll realize how instrumental it is. If you can replace one without going to the mechanic, you’ll be able to spend less.

Conclusion
The life cycle of a muffler depends on routine maintenance. To prolong its life, proper installation and continuous readjustments and part replacements are necessary. The car muffler remains an integral part of the vehicle and can endure all road conditions if well maintained. Bear in mind that if you want your car to take care of you on the road, take care of it in the garage. We hope you’ve learned how you can install a muffler without welding.
Check out some of our top trending posts:
- 5 Best Welders for Auto-Body Work (MIG & TIG) – Top Picks & Reviews
- How to Become a Certified Welding Inspector
- 10 Reasons Why Welding Is an Important Industry
Feaured Image Credit: bbeavis, Pixabay